


As a working photographer you will end up with a few different modifiers in your kit and a large part of being a working professional is testing them.
You buy a new bit of kit, you test it and test it some more. Not only to get to know it but to make sure all is well before you deploy it on a client job.
Hard reflector modifiers come in many shapes and sizes and all will project, focus, spread light in a different way. Over the rest of this blog post I wan you to notice the changes in light spread and pattern against the background and surrounding areas and also the change in colour.
Different modifiers will affect not only light spread and output but also colour. Let’s get in to the comparisons.
To start with I used the Godox AD600 Pro set on a C-Stand and the standard reflector that comes with the 600 Pro. This is out starting point colour corrected and our control. the only times I changed the light used was for the Magnum reflector, this is so we could take a look at the zoom function when mounting the Godox 300 Pro in to an S-Bracket and also for the bare bulb reflectors used on the AD200/AD360 series.
** One thing to note, you will see some highlight reflections on the background on some images, this is light hitting the light fixatures in the studio and is not a characteristic of the reflector being used.
This AD600 Pro reflector (AD-R9) gives quite a wide throw but not the widest. I would say 50-55 degrees., It also doubles up as a cap to protect the flash tube when travelling .
Not my favourite reflector interms of output performance but usable and great to save on kit to carry as it goes where the light goes anyway. It has a hotter centre but light is getting to the floor and ceiling, this is because the flash dome sits almost flush with the front of the reflector.
The wide angle reflector is actually not that wide as we can see, it is designed to control light spill so is more of a spill kill really, Some were made to work with shoot through umbrellas but this one does not have any umbrella shaft hole and I would argue it would not make for a good combo in regards to filling a light modifier like an umbrella.
It has a 120degree spread but quite a bit of edge fall off.
This reflector is also a good stop or more more efficient than the AD600 Pro reflector.
The Godox RFT-19 High performance LED reflector is great, you gain a ton of output even with flash. Ok It’s internal design is made for COB LED chips but I really like it’s output.
Whilst it is not a long throw or Magnum reflector it puts out some serious light. You can see how much more focused it it than the other offerings so far bringing in darker edges, in some ways like a grid may do.
Lencarta 7” Reflector. This is not quite as deep or large as the reflectors for my Godox QTIII Heads but it doe stake my smaller 7” grid spots so I kept hold of it. Nice wide throw but a tad more focused than the AD600 Pro reflector.
It is rare I used this one on it’s own as I usually insert 10,20,30,40 degree grids in to it. If you would like to see a future post comparing grid patterns let me know.


Next are a couple of Bowens umbrella Reflectors designed to be used with reflectove and shoot through umbrellas. On has a dimpled edge and the other smooth edge.. also one may not quite be in it’s original shape * Cough*.
Slight changes but these are ultimately design to be used with umbrellas preventing spill of bare bulb light and filling umbrella as much as possible. You can control this further by moving the flash tube/head closer or further away using the umbrella shaft.
7” Reflector Deep.
This is an older reflector in my kit and gives a slightly more focused light pattern than the 7” Lencarta reflector from earlier.
This should also fit my 7” grid spots also.
The standard reflector that comes with Pixapro Storm / Godox QT series of studio mono blocks. AD-R6
This reflector can be used with umbrellas but provided a slightly tighter beam so may not fill the edges of the modifier as well. I also have a set of grid spots for these reflectors as it is a different size than my 7” grids.
Make sure when you are ordering any reflectors that they will fit your light, not just in the mount type but also where the umbrella shaft holder is located.

Ahh the venerable Magnum Reflector. I love this modifier.
It comes with a diffusion sock which we will show next but OMG does this thing throw light. You can see just how focused it is, surprising given the size right?
It is all down to the shape of the Magnum. A more parabolic ( not true) shape. You will gain 2 stops more light over some reflectors. 2 Stops.
Adding the diffusion sock to the Magnum spreads the light more but still has a hot spot due to the nature of the Magnum and how it works. It give a nice punch still and the diffusion reduces specularity. Look how much the diffusion has warmed up the colour temperature as well.
The Pixapro 45 Degree Long Throw Zoom Reflector is another interesting one. Given it’s shape you would think it would provide a tighter beam than the Mangum. Nope.
It does still provide a night tight pattern though and it also comes with a grid.
This would be great to hit someone with light from far away like the Magnum. You see them both used in fashion and also sports photography work.
The 40 Degree grid tightens the beam nicely offering another options and more control although I would say less control than the Magnum reflector with certain lights as you will see later in this post.
21.6” White Beauty Dish. You can see where the bare bulb is being seen casting a hard shadow (ceiling and floor).
I tried a few different dishes before deciding on this and a Silver version. Both give great light and come with grids and diffusion socks.
Used a lot in portraits, beauty and fashion. There is something about the light from a beauty dish.
My beauty dishes are older type no longer made, you can however buy the same wise white Godox version here.
The diffusion sock diffuses the light and also reduces hot spots you may get when angling the beauty dish to a background. Remember anything that see’s that bare bulb in a beauty dish will get bare bulb light hitting it. This could be your client/subject or a background.
You an see quite clearly the change in the spread of light on the ceiling and floor.
Bit of an unusual setup with the grid and diffuser but it can be done, eats a lot of light.
For some reason I forgot to shoot the white beauty dish with the grid. I did however shoot the silver version with it’s grid so we have that coming up.
21.6” Silver Beauty Dish.
You can see the colour shift on the Silver Beauty Dish to a cooler colour temperature, you also gain output compared to the white.
My beauty dishes are older types and are lo longer made, you can however pick up the same size Godox versions here.
Silver Beauty dish with grid. Grid are awesome as they offer s ton of control.
You can see the dramatic change from bare dish to the grid. You will get much more contrast with the grid and if you are wanting to use a fill you are better off using an active fill as the grid will prevent light from hitting any reflectors in some cases.
21.6” Beauty Dish with Sock. Diffusing the light and making the spread more even.
Again you also lose the risk of shadows from the dish edge being cast on the background.
We now switch out to the Pixapro Pika 200 Pro / Godox Ad200 Pro so we can take a look at the bare bulb pattern and also the hard reflectors for this type of light.
These reflectors can only be used with the bare bulb head and not the Fresnel head.
I have included a bare bulb shot as this is how people will have the AD200 setup before they modify it. It spreads light everywhere it will also provide you with a very hard light on a subject and it you want deep dark shadows you will need to prevent light bouncing around your studio space (especially if white).
You can prevent spill by using a reflector or surround the bulb with black card so only your subject can see the bulb.
The bare bulb head is also the head you want to use in Softbox type modifiers due to the omni directional light pattern of the flash tube.
The Pika 200/ AD200 umbrella reflector. Godox AD-S6 can be used with umbrellas which makes for a very small and compact lighting kit.
Providing quite a focused light I would expect to have to play with the position of the umbrella on the shaft to get full coverage of the modifier.
The Godox AD-S2 5” reflector is the standard reflector for the AD200 series of light. It can be used with a grid, diffuser cap ( which I have misplaced) or colour gels.
Providing a more focused light pattern than the previous AD-S6 making it less suitable for use with umbrellas.
You can get the whole kit AD-S11 which includes the reflector, grid, gels.
You can see the much more restricted light pattern when the 50 Degree grid is used in this reflector again offering further control.
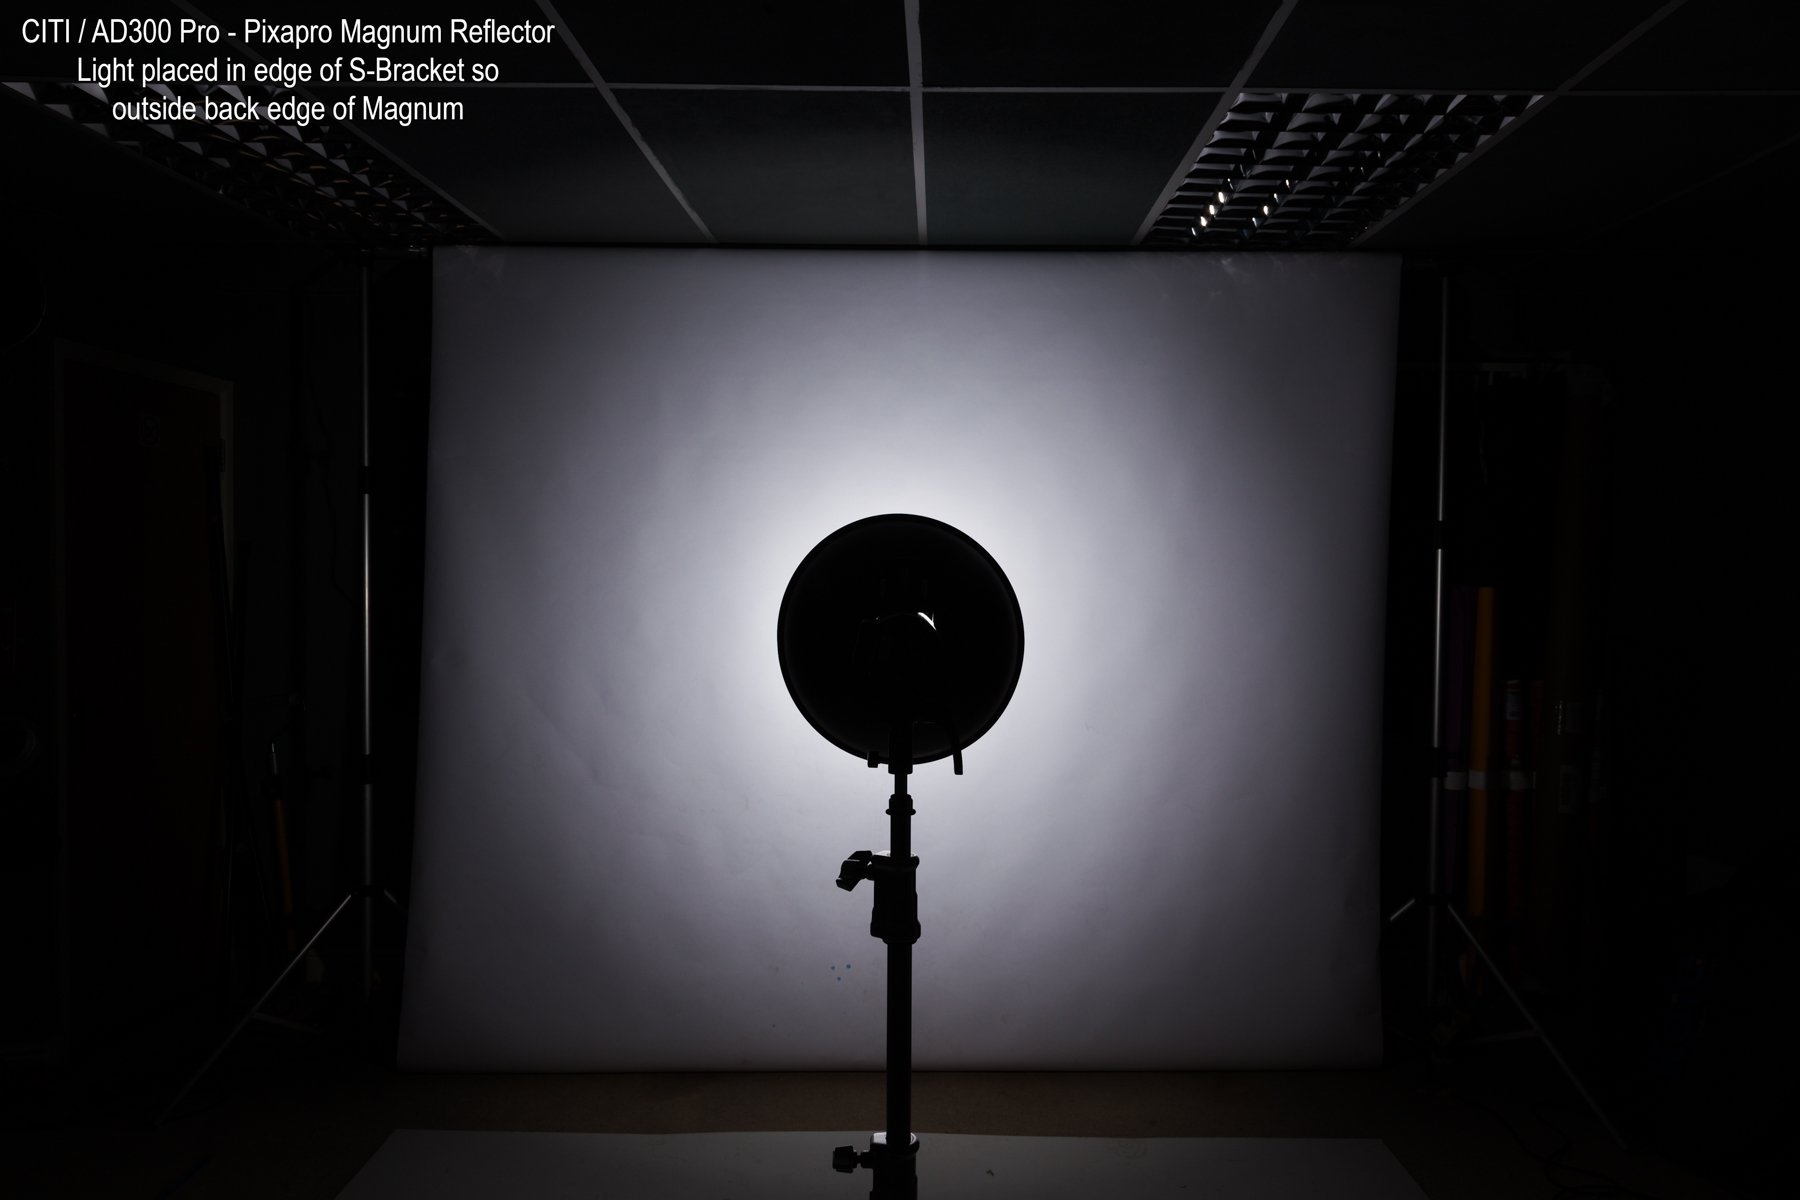
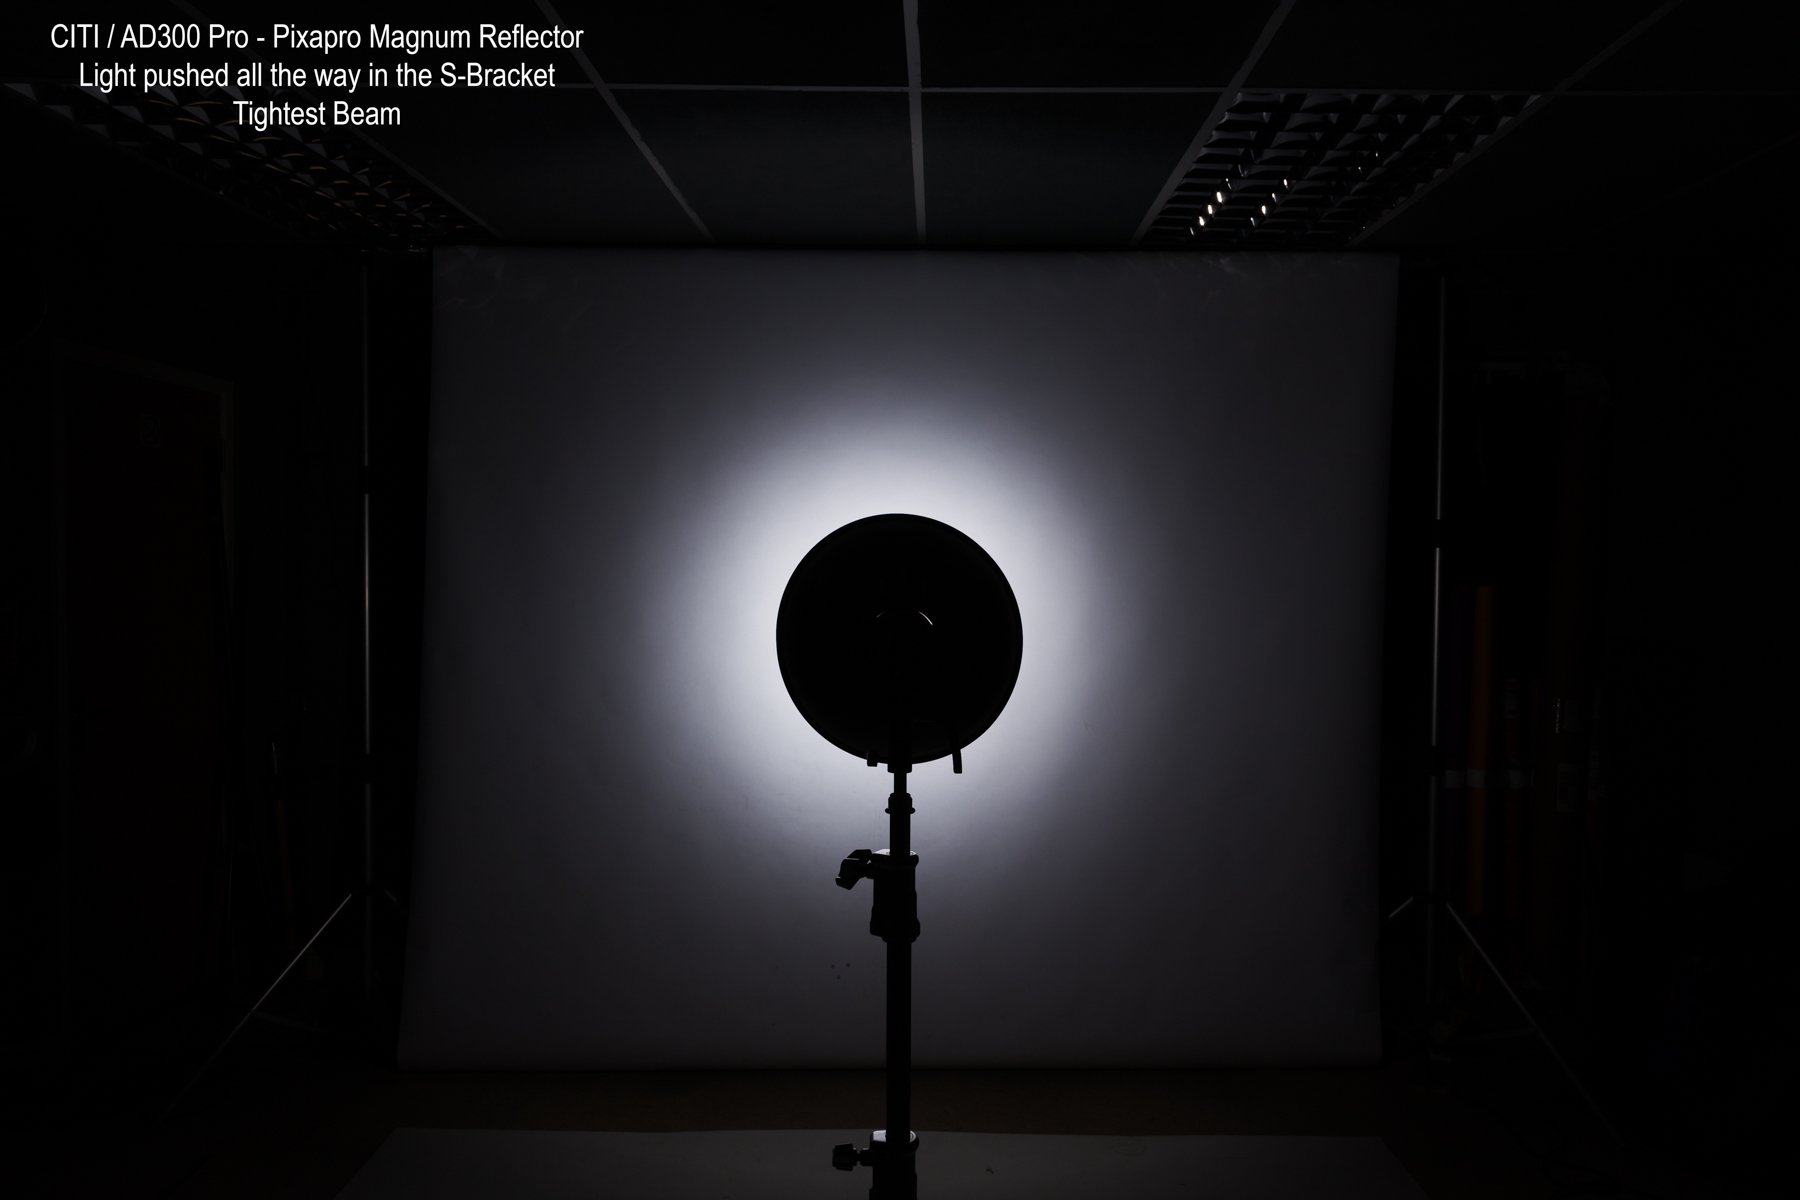
We now switch out to the AD300 Pro so we can take a look at it’s own reflector and also another feature of the Magnum Reflector when parried with this light and the S2 Bracket.

The AD300 Pro standard reflector Godox ADR-13. Provides a nice compact setup and give a good spread of light, similar but not quite as wide to the AD600 Pro reflector.
It also doubles up as a cap for the flash tube when traveling with the light.
Here we have the Magnum Reflector with the AD300 Pro backed all the way out in the modifier. This allows the widest spread of light but still retains the hot spot provided by the Magnum.
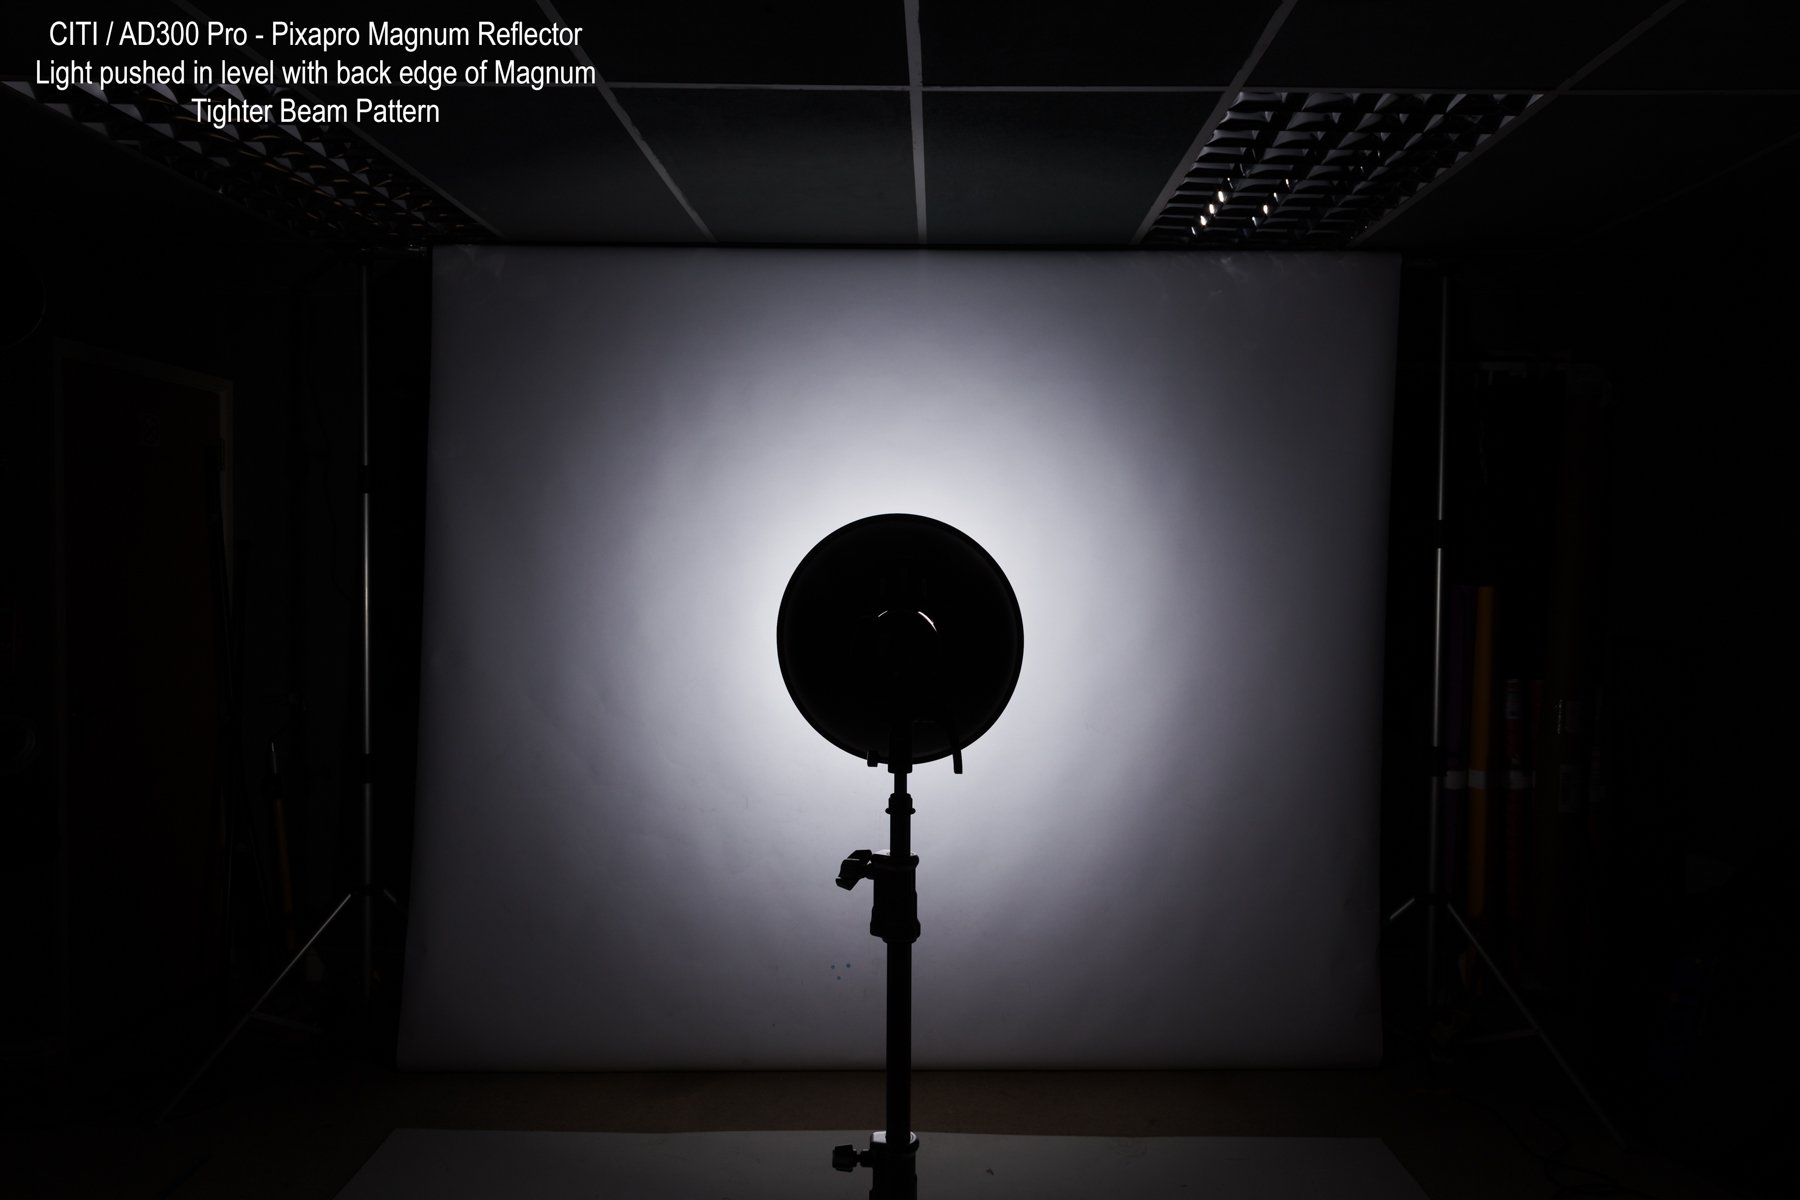
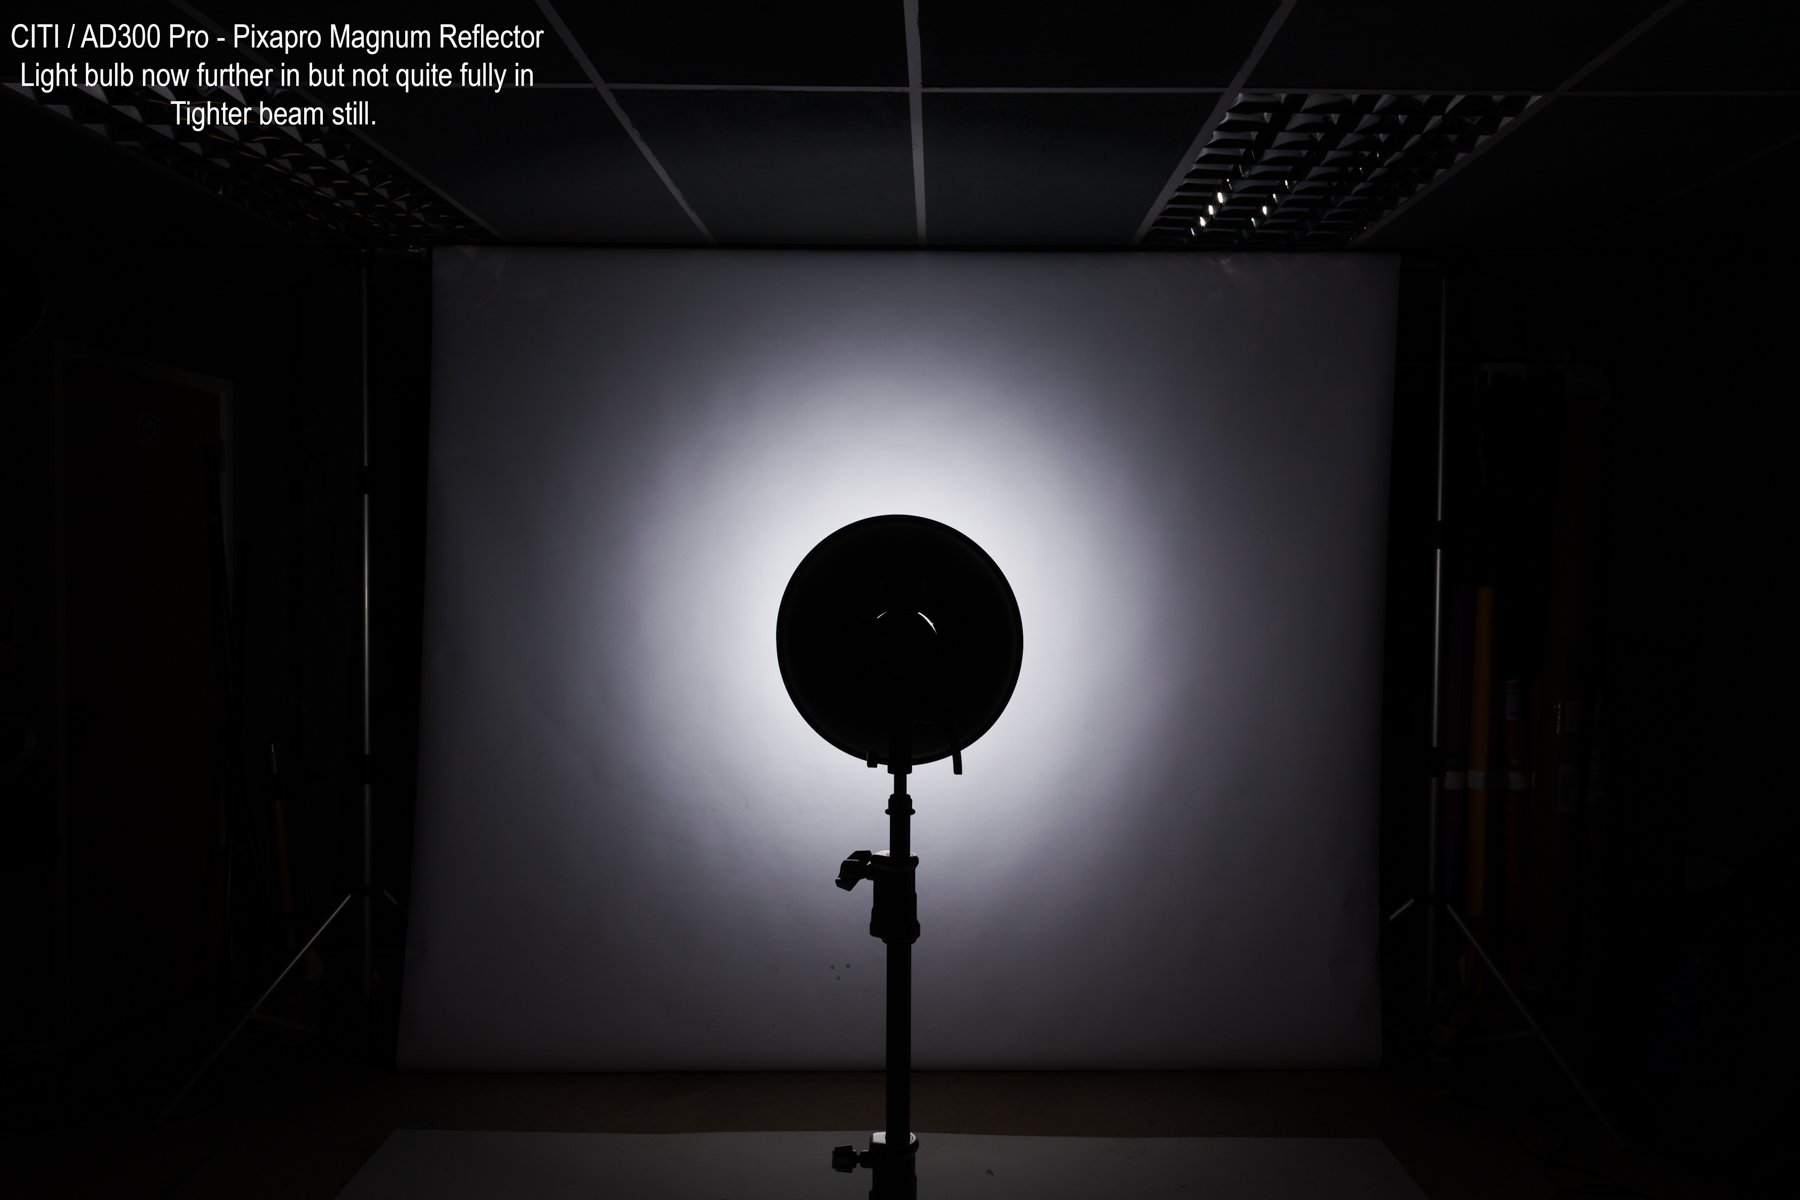
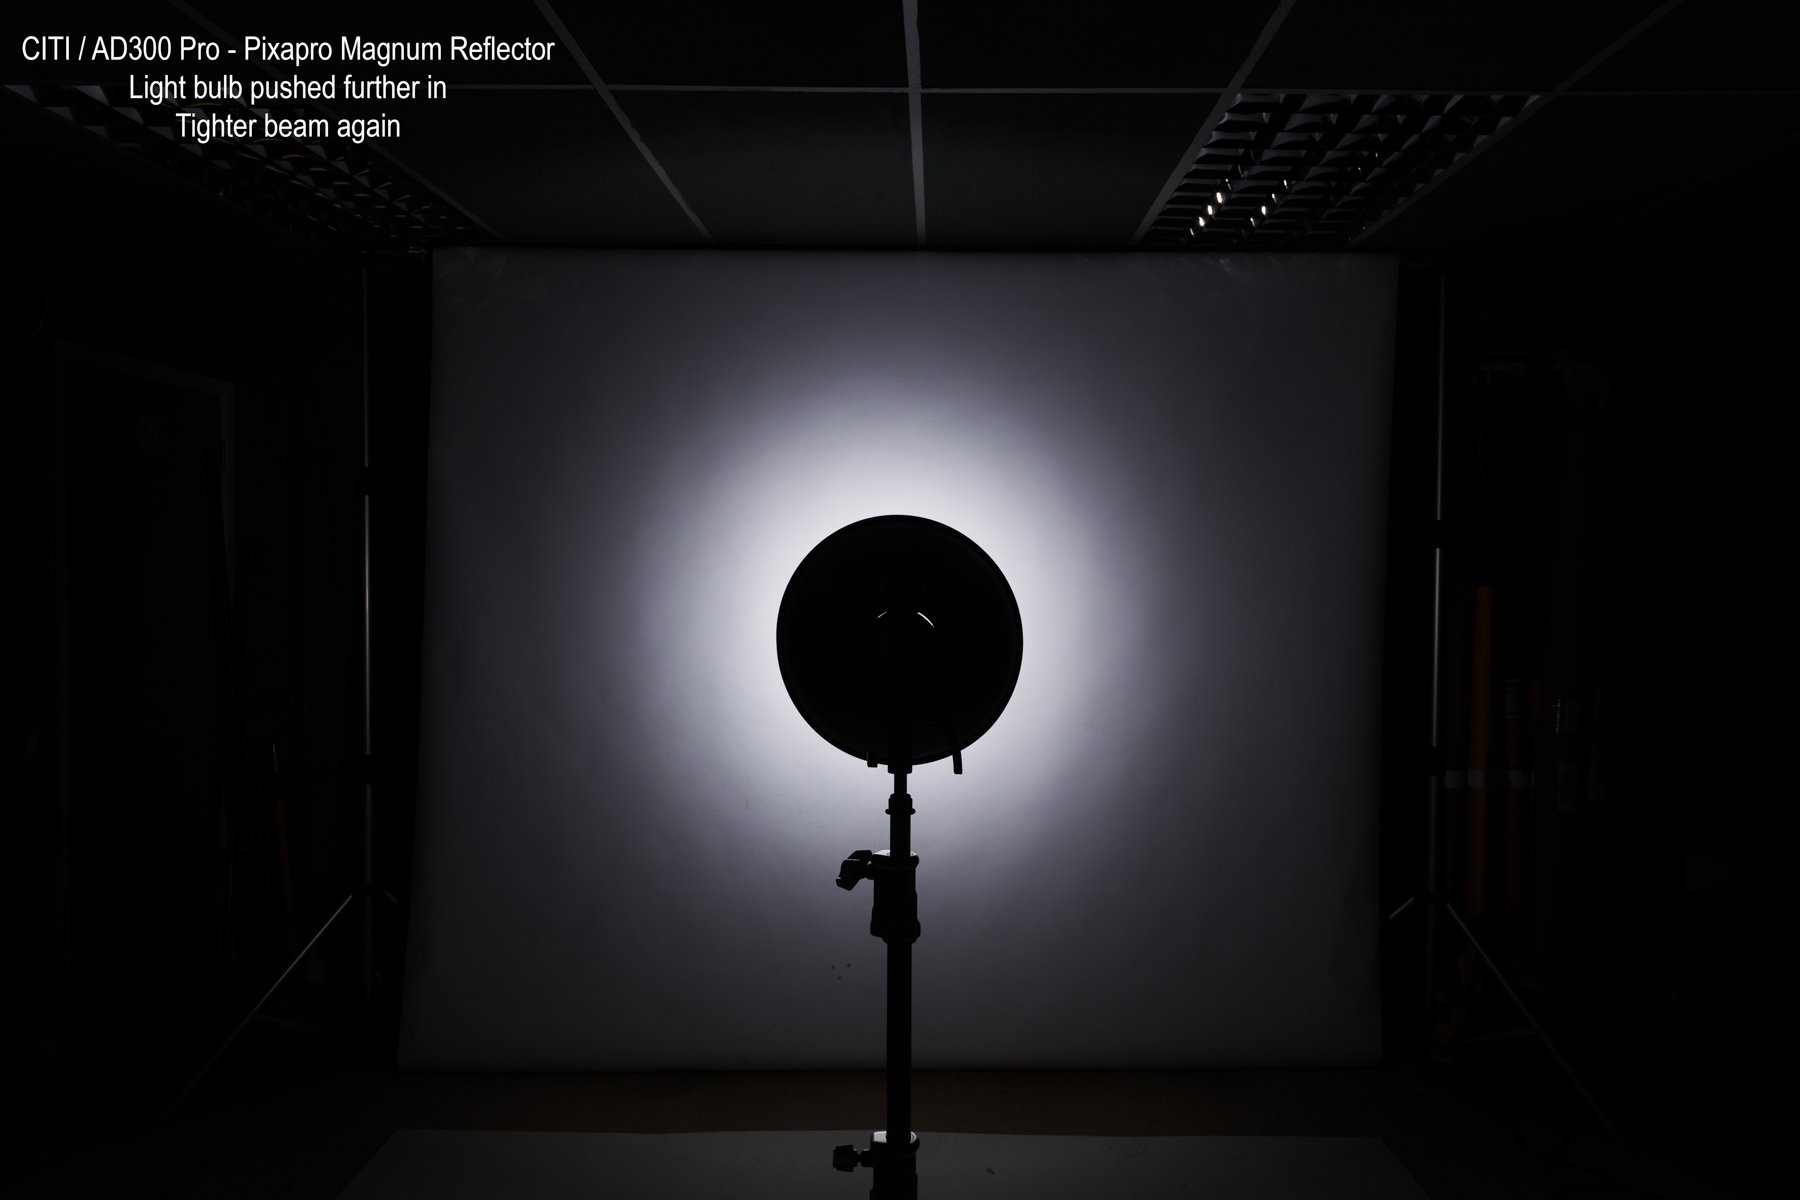
The following gallery of images will show the light pattern as we push the AD300 Pro further in to the Magnum Reflector creating a tighter beam pattern as we go. Whilst the Magnum Reflector does not have any grid modifier to add on to it, with this setup you still have plenty of control.
Other lights that this could work with are the AD200/AD200 Pro/AD200 Pro II or and zoomable head of the P2400 Pack system. I would not use a Fresnel based light in this modifier personally as is it designed to be used with a bare bulb.

Hopefully this has been helpful to some of you and informed you about whish hard reflector you may grab on your next shoot or job.
Of course we have many more way to use all of the above modifiers in terms of placement or within multiple lighting setups. If you would like to see further comparisons or lighting modifier tests, let me know in the comments below.
Thank you for reading.
Rick